A Volumio music box I made for my 4 year old son. We already use Volumio in the house and wanted him to have a more portable device. I had made him a radio using an Arduino and MP3 Shield when he was 2 but his now 2 year old brother has sort of taken over it. A full write up of the project can be found here https://github.com/adamguenther/kaipod2 I will be updating the write up with more build images.
Here are the basics of the build, Let me know what you think and any suggestions for some of the issues I address or suggestions to improve.\
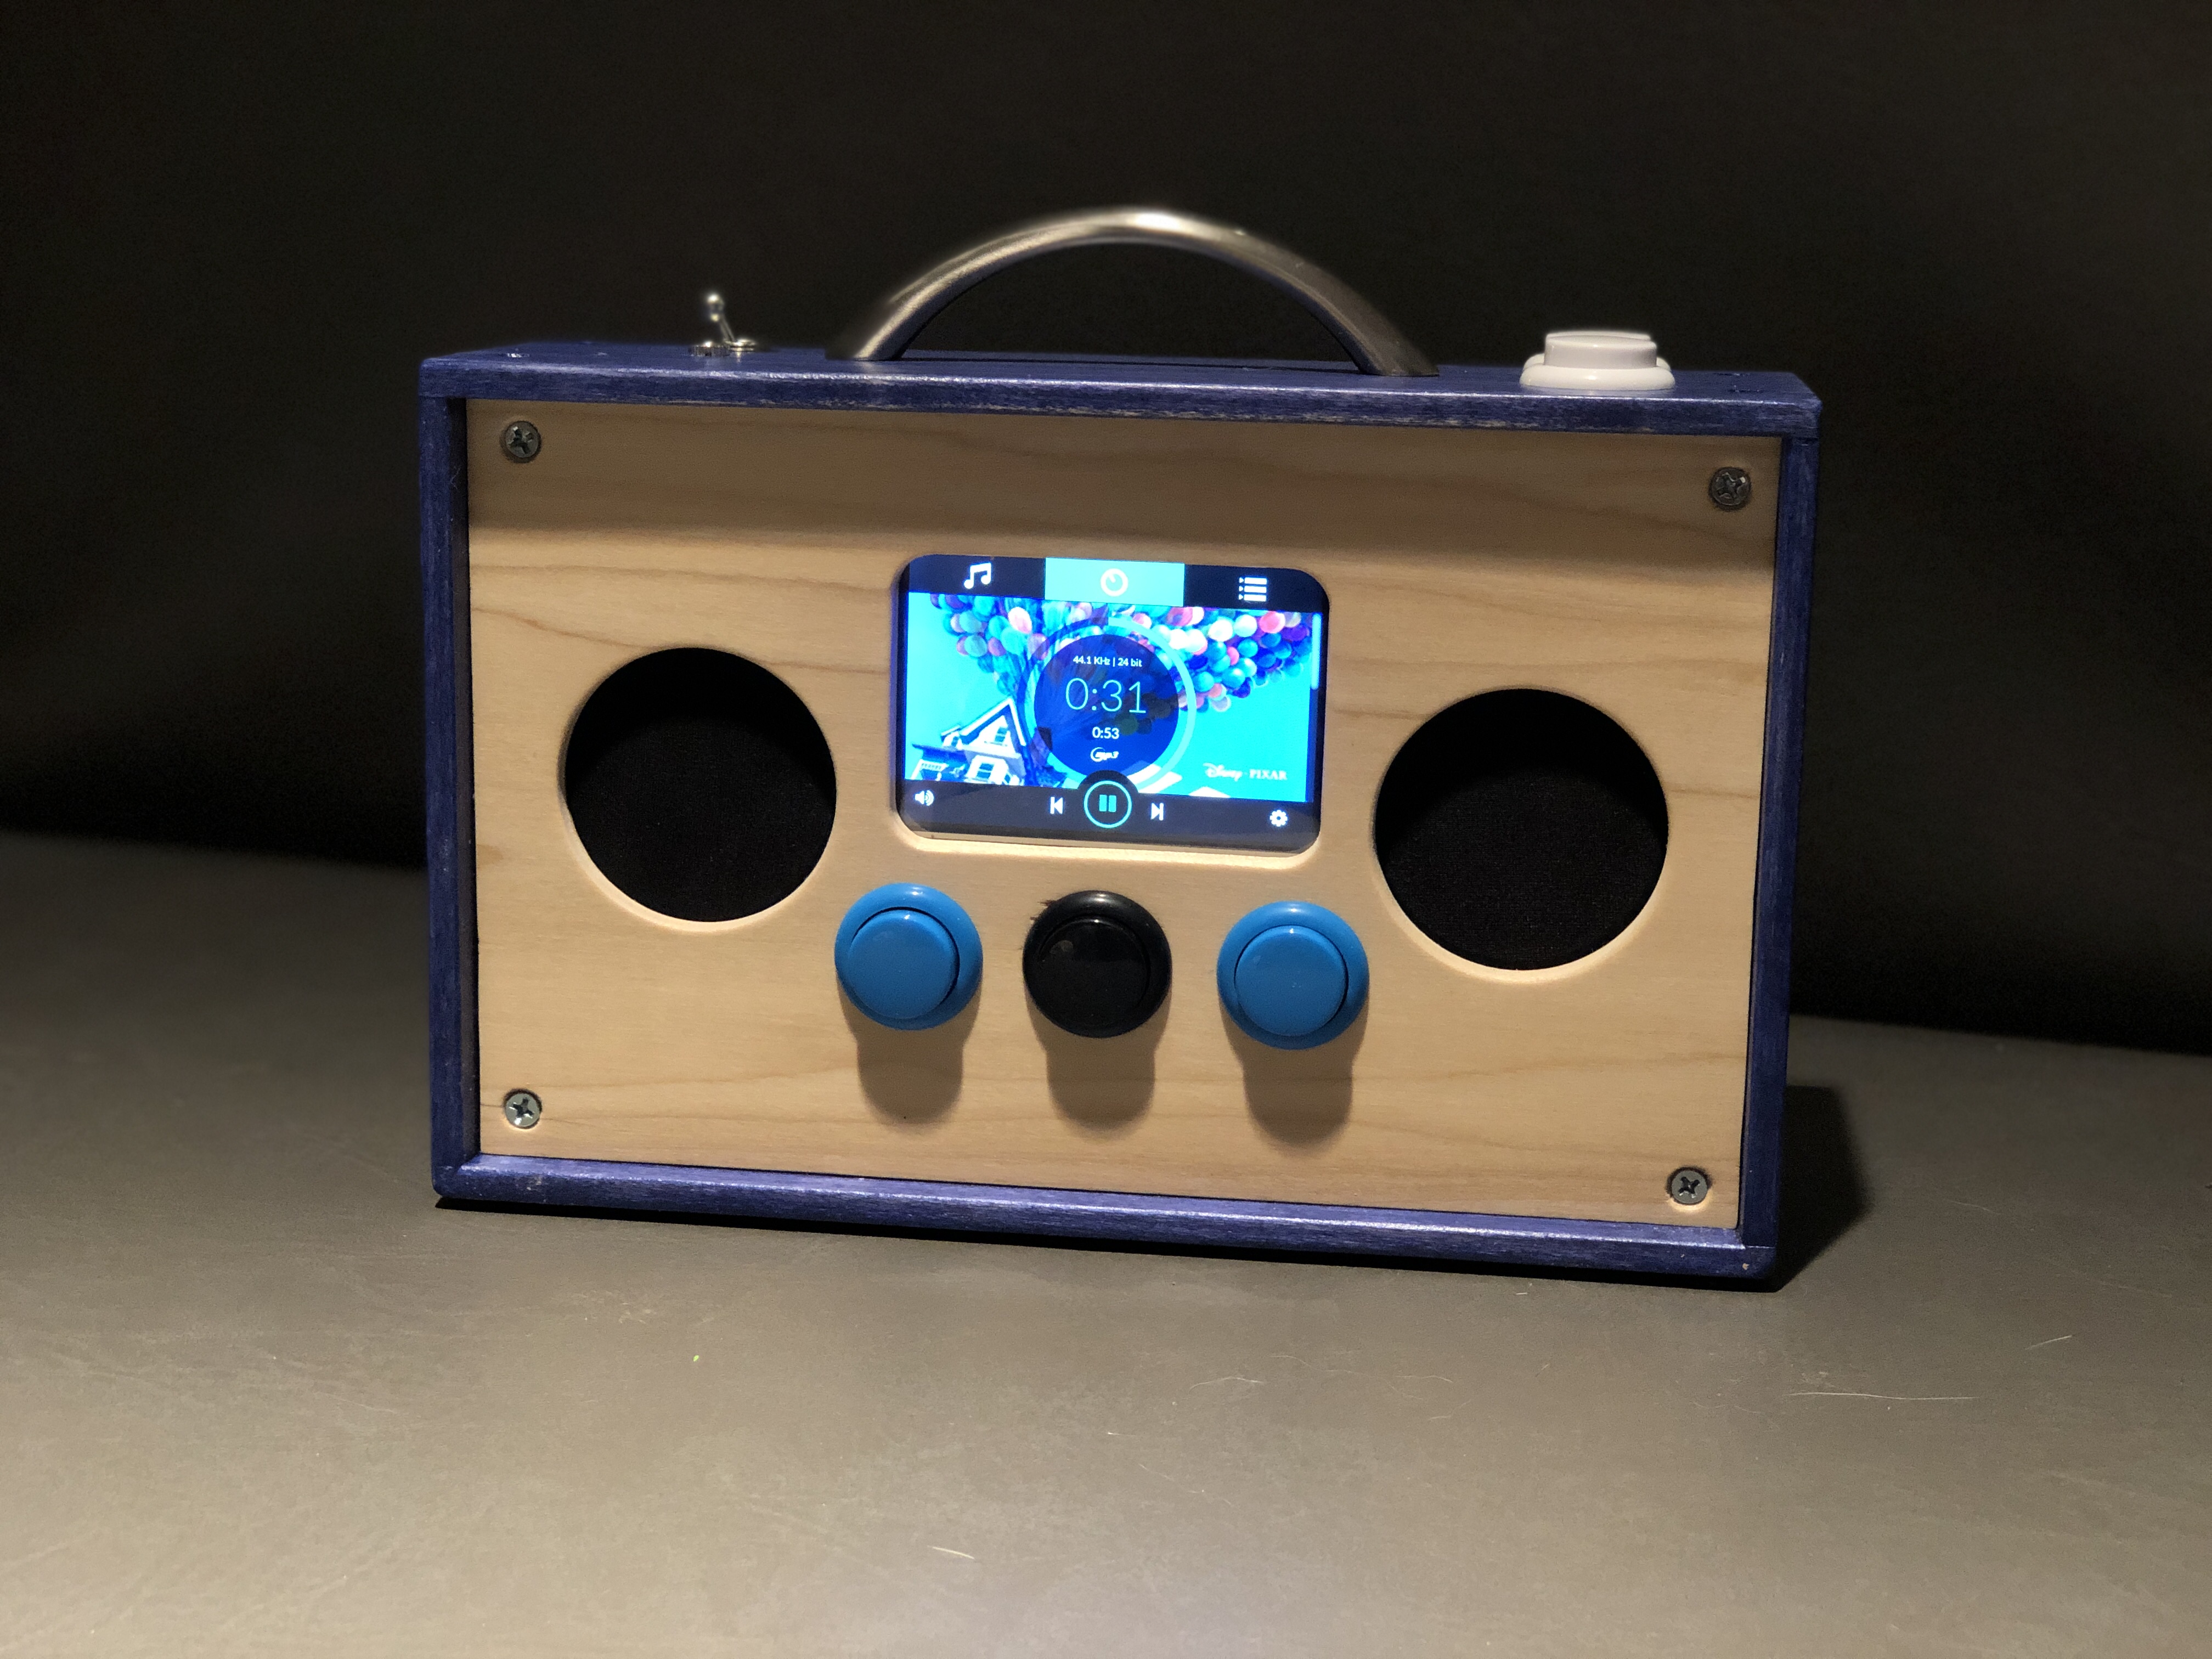
This is a project I did to build a networked portable radio for my 4 year old son. I had previously built a simple radio using an arduino UNO and a MP3 shield, housed in a wooden enclosrue I also made. The aim was to make an easy to use music player that was solidly built. I was not happy with the offerings of MP3 radios for kids which were either too complicated, ugly, or cheaply made. Also many of them included a microphone permanently attached, however not all kids want to sing along. I have not documented that build and it has been a couple of years but I may go back and document it as the radio is still in heavy use. The issue is that my 4 year old’s 2 year old brother has taken over the radio. Its simple and sturdy design makes it easy for my 2 year old to operate and abuse. So now it was time to upgrade my oldest son. I still wanted the small lunchbox sized wooden design but had a list of things I wanted to address.
First, we have been using a Pine64 single board computer with Volumio installed to run an iPod Hifi unit as the main source of music in the house. The sound of this short lived speaker unit is still in my opinion great and the software enables it to be an Airplay receiver and music server that can be controlled on the local network through a web interface. A nice feature is that if you have multiple units running Volumio on the network they show up to be quickly selected and controlled from the web interface. I often found myself sneaking into my son’s room at night to turn down or turn off his radio. Building the radio around Volumio I would be able to control it remotely. Also as it is netoworked I can upload new music and do software maintenance without having to physically connect to the device or pull the SD card. As the device could be controlled through the web interface I can quickly create new playlists or change the music up ont he device and it still acts as an Airplay receiver. Volumio will also broadcast its own hotspot so even out of the house the device can be controlled through the webinterface and be used as an Airplay speaker.
Second, I had powered the first radio with just an off the shelf powerbank, the unit has some issues, mainly it does not put out power when charging up. It also is just a battery so tapping into power for other things isn’t cleanly done. I chose to use the Powerboost 1000c from Adafruit and a 4400 mAh lithium ion battery for the power.
Third, using Volumio headless and without an external device like a phone or tablet would mean my son would have less options to change the music if he wanted than the simple arduino device which gave him 9 playlists to choose from at the touch of a very clicky button. To remedy this I wanted to incorporate a touchscreen interface and chose the PiTFT+ 3.5" resistive touchscreen from Adafruit.
Fourth, I wanted to incorporate a switching headphone jack so my son could listen to his music privately and really apreciate the solitude. I had gotten him some nice childs headphones that had volume limiting, they look like baby beats and actually dont sound too bad, and a terrible “childs” portable MP3 player for a trip we took. I could barely figure out the MP3 player but when I got it playing music he enjoyed just sitting and listening to his favorite Pixar and Disney scores. The headphones have the added bonus of blocking the sound from his brother which can sometimes bother him as little brothers do.
Fifth was in regards to the enclosure, I have a great interest in woodworking and wanted to up the fit and finish of the enclosure. How to mount the touchscreen was a big issue I wanted to address cleanly, without access to a laser cutter or CNC router I would need to plan and cutout the window for the display. I chose to do this with a template and a flushcut bit on a router. This also gave the window rounded corners which look nice with the overall friendly wooden toy aesthetic.
List of components:
Raspberry Pi 3 B+ (this project could have been done with as little as a Raspberry Pi Zero W, but I wanted to have the added oomph availible if need. And although I have not implemented it or tried it, Kodi can be installed along with Volumio if I ever wanted to allow myson to watch videos on the device and its tiny screen. As a general rule we heavily limit screen usage so currently don’t want him to be able to watch videos in his room)
Micro SD Card 8gb or higher, I went with a 16gb SanDisk
Adafruit PowerBoost 1000c adafruit.com/product/2465
Adafruit PiTFT Plus 3.5 Resistive LCD adafruit.com/product/2441
Adafruit Stereo 2.1W Class D Audio Amplifier adafruit.com/product/1552
Gikfun 2" 4Ohm 3W speakers x2 amazon.com/gp/product/B01CH … UTF8&psc=1 (used these for the previous radio, and impressed with the sound and price. Especially as they are being used ona volume limited childs radio I haven’t had issues with distortion or overdrive from them)
3.5mm 3-pole Female Stereo TRS Balanced Socket with Switch amazon.com/gp/product/B00ZY … UTF8&psc=1
3.5mm (1/8inches) Stereo Audio Male to AV 3-Screw Terminal Female Phoenix Adapter Connector amazon.com/gp/product/B01LW … UTF8&psc=1 (at one point was going to use more permanent soldered connectors but never got around to it or saw the point once I had it all together and working)
on/off toggle switch, I had one laying around but here is a similar one amazon.com/Uxcell-a13042900 … 2+position
Sanwa clone arcade buttons amazon.com/gp/product/B01N5 … UTF8&psc=1
GPIO ribbon cable for connecting the display allowing more positioning options of the components amazon.com/gp/product/B01L6 … UTF8&psc=1
Various hookup wire, most 22AWG and some jumper wires
Heatshrink tubing, zip ties, hotglue solder etc…
Software things
Volumio for Raspberry Pi volumio.org/get-started/
PiTFT+ Easy install script learn.adafruit.com/adafruit-pit … -install-2
Volumio touch display plugin (installed through Volumio web interface) github.com/volumio/volumio-plug … ch_display
Volumio GPIO button plugin (installed through the Volumio web interface) github.com/volumio/volumio-plug … io-buttons
Final Thoughts and Issues to be addressed
Issues
Bootup and Shutdown: bootup is close to 60 seconds on this device which is quite long for its purpose, it is loading a Linux OS but for a child’s device it is slow. Especially compared to the 5 second bootup of the arduino based project my son is used to. Shutdown is another issue, while I did include a power switch that cuts power output from the Powerboost 1000c this is still equililant to a hard shutdown, which is not good for the OS. Properly shutting down the OS doesn’t cut power to the LCD thus the need for the power switch. I suppose a script thats tied to another GPIO to control the powerboost somehow could be implemented. Not sure.
LCD backlight: the LCD backlight remains on even when the display “sleeps” so there is always energy draw and a glow. This can be controlled a couple of ways, neither of which are automatic.
First a CLI command can be run to utilize the STMPE GPIO as documented by Adafruit learn.adafruit.com/adafruit-pit … ht-control
To turn off
sudo sh -c 'echo "0" > /sys/class/backlight/soc\:backlight/brightness'To turn on
sudo sh -c 'echo "1" > /sys/class/backlight/soc\:backlight/brightness'Secondly GPIO 18 can be used to control various settings, this is something I will likely implement with another physical button. Again a script thats tied to GPIO 18 and the sleep state of the display could probably be implemented.
Low Voltage: this is a mistake of mine. The Powerboost 1000c is a great little circuit but it only outputs 1 amp, when it would be best to to have a 2.5 amp supply given the power requirements of the audio amp, raspberry pi and the display. I would like to find a similar circuit that outputs 2.5 amps or more which would hopefully require minimal rewiring. The device does fine when plugged into a 2.5 amp supply, however its a roulette game if the device is booting up not connected to power if it will complete the boot up. It runs OK once booted and just playing local music files. However if any other activity such as transferring files to the device via SFTP or running commands over SSH is occurring while on battery power the low voltage warning MAY come up. This is less of an issue when the backlight is off.
The touchscreen itself: its resistive and not great, its doing the job, however a capacative model would be better. Possibly using a larger 5" or 7" screen would also help. If I did that the physical buttons would either have to be smaller or eliminated completely.
Final Thoughts
Overall I am moderately happy with how this turned out. My son uses it most to listen to music when he goes to sleep so addressing the backlight is the biggest concern. I will continue to work to address the issues I have with it as I have been asked if I would make similar music players for some friends and family. If anyone has suggestions for any of the issues described please let me know.